Claude Agent SDK: Part 2
Continuing to explore Anthropic's Agent SDK - making tool calls more descriptive and learning about Python introspection.

- David Gérouville-Farrell
- 7 min read

My goal today is to make the minimal writing agent from Part 1 a bit more user-friendly. I’m starting with making the tool calls more descriptive.
Here’s what they currently look like:
Assistant:
[Using Glob...]Let me search more specifically in the content folder for blog posts:
[Using Glob...]Based on the file dates, the most recent post appears to be from December 21, 2025. Let me read it:
[Using Read...]
You can see tool usage happening ([Using Glob...], [Using Read...]), but there’s no information about what the tool is actually doing. What pattern is Glob searching for? What file is Read opening?
Figuring Out What’s Available
First, I need to figure out what information is available on a ToolUseBlock. When I started typing in my IDE, IntelliSense suggested a signature property:
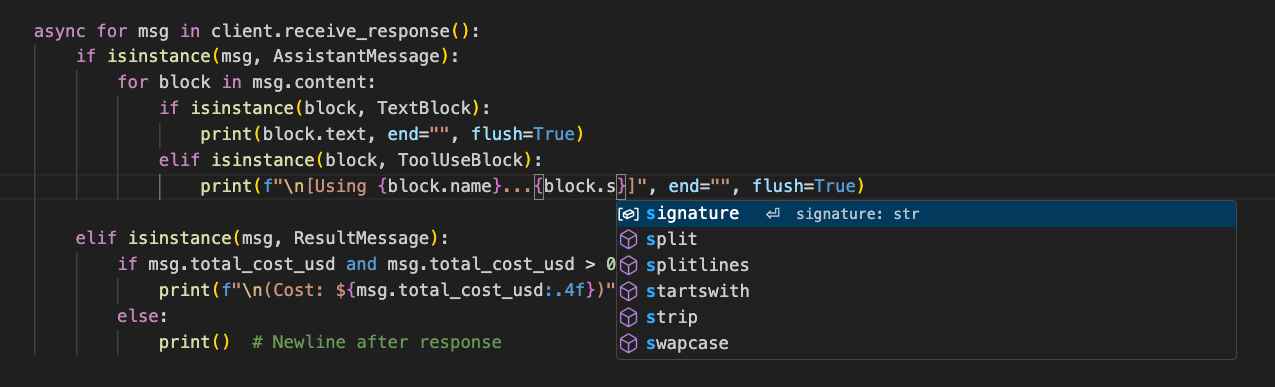
But when I tried to use it, I got an error:
AttributeError: 'ToolUseBlock' object has no attribute 'signature'
IntelliSense was getting confused somehow. The signature property it suggested actually belongs to a different class (ThinkingBlock) that happens to be defined nearby in the same module. It surprised me that IntelliSense would get confused by two classes defined in the same module, but Claude suggested that’s the case. According to Claude, type narrowing inside elif isinstance() branches isn’t always reliable.
I was a bit skeptical of this explanation, and because I’m posting this publicly, I did a little digging. It turns out this is actually a known limitation of static type analysis in Python. In the SDK, block is defined as a union of four different classes: TextBlock, ThinkingBlock, ToolUseBlock, and ToolResultBlock. The process where the IDE notices we’re inside an isinstance(block, ToolUseBlock) check - and therefore knows which of the four classes we’re actually dealing with - is called “type narrowing”. It requires the IDE to interpret the code structure and perform that narrowing dynamically. Language servers like Pylance (the engine behind VS Code’s Python support) don’t always do a good job of this when the code structure is complex.
I wrote a small script to inspect the actual properties of ToolUseBlock:
from claude_agent_sdk import ToolUseBlock

# Try to find source or show class info
print('Type:', type(ToolUseBlock))
print('MRO:', ToolUseBlock.__mro__)

# Check if it's a dataclass or has annotations
if hasattr(ToolUseBlock, '__annotations__'):
    print('Annotations:', ToolUseBlock.__annotations__)
if hasattr(ToolUseBlock, '__dataclass_fields__'):
    print('Dataclass fields:', list(ToolUseBlock.__dataclass_fields__.keys()))
if hasattr(ToolUseBlock, 'model_fields'):
    print('Pydantic fields:', list(ToolUseBlock.model_fields.keys()))
This script uses Python’s introspection capabilities to discover what’s actually available on a class at runtime:
type()- Confirms what kind of object we’re dealing with (a class, in this case)__mro__- “Method Resolution Order” - shows the inheritance chain, so we can see what the class inherits from__annotations__- Shows type hints defined on the class (available on any class with type annotations)__dataclass_fields__- If it’s a dataclass, this contains all field definitionsmodel_fields- If it’s a Pydantic model, this contains field definitions
Running it shows:
Type: <class 'type'>
MRO: (<class 'claude_agent_sdk.types.ToolUseBlock'>, <class 'object'>)
Annotations: {'id': <class 'str'>, 'name': <class 'str'>, 'input': dict[str, typing.Any]}
Dataclass fields: ['id', 'name', 'input']
So ToolUseBlock has three fields: id, name, and input. The input field is a dictionary containing the parameters passed to the tool which is what I wanted to show.
Making Tool Calls More Descriptive
I updated my code to show what each tool is actually doing:
elif isinstance(block, ToolUseBlock):
    print(f"\n[Using {block.name}... {block.input}]", end="", flush=True)
And here’s what the output looks like now:
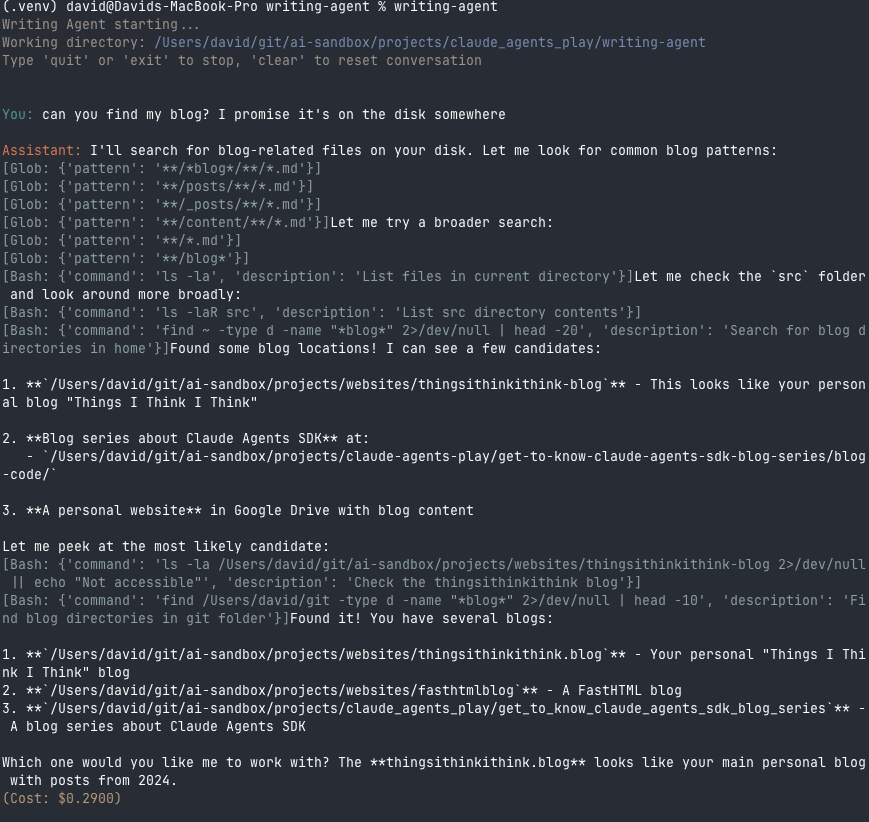
You: find my blog - be super thorough - it is somewhere!

A: I'll search thoroughly for your blog folder. Let me try multiple approaches to find it.
[Using Glob... {'pattern': '**/*blog*/**/*.md'}]
[Using Glob... {'pattern': '**/*post*/**/*.md'}]
[Using Glob... {'pattern': '**/content/**/*.md'}]
[Using Glob... {'pattern': '**/_posts/**/*.md'}]
[Using Glob... {'pattern': '**/articles/**/*.md'}]
[Using Grep... {'pattern': '^---\\s*', 'glob': '*.md', 'output_mode': 'files_with_matches'}]
Let me expand my search to look in more locations and with different patterns:
Now I can see exactly what patterns Glob is searching for, and what regex Grep is using. Much more informative!
Adding block.input to the output lets me see what the tool is actually doing - which patterns it’s searching, which files it’s reading, which commands it’s running. This makes debugging much easier and gives me confidence that the agent is doing what I expect.
Adding Some Polish
Colors
I wanted some color in the terminal to make the output easier to scan. I didn’t know much about ANSI colour codes (vague memories from my youth mibbe):
DIM = "\033[2m"
The \033 means “ESC” - i.e. an escape sequence is starting. The [ specifies that this is a “Control Sequence Introduction”. Then comes parameters, and finally m is the SGR (Select Graphic Rendition) command terminator.
For example, \033[2m means ESC + CSI + ‘2’ + SGR Terminator = “turn on dim/faint text”. The 2 is an SGR parameter code - different numbers do different things: 0 resets to default, 1 is bold, 2 is dim, 38;2;R;G;B sets a 24-bit RGB foreground color, and so on.
These two websites are useful for exploring options: https://ansi.gabebanks.net/ and https://ansi-generator.pages.dev/
Here’s my colour palette:
# ─── Colors ───────────────────────────────────────────────
ESC = "\033["
RESET = f"{ESC}0m"

BANNER = f"{ESC}38;2;156;147;138m"    # warm taupe gray
USER = f"{ESC}38;2;86;148;148m"       # muted teal
ASSISTANT = f"{ESC}38;2;217;119;87m"  # coral/terracotta
META = f"{ESC}38;2;180;156;120m"      # muted amber
ERROR = f"{ESC}38;2;204;82;82m"       # warm red
CODE = f"{ESC}38;2;140;160;160m"      # blue-gray for tool calls
PATH = f"{ESC}38;2;120;140;180m"      # soft blue
# ──────────────────────────────────────────────────────────
And this is what it looks like when I run it:
Multi-line Input with prompt_toolkit
I wanted the behaviour where Enter/Return just does a line break, and Option+Enter submits the message. Python’s built-in input() always submits on Enter - there’s no way to change that.
I found prompt_toolkit - a library for building interactive command-line interfaces with custom key bindings.
uv pip install prompt-toolkit
Here’s how I set it up:
from prompt_toolkit import PromptSession
from prompt_toolkit.key_binding import KeyBindings
from prompt_toolkit.formatted_text import ANSI

# Set up key bindings - Option+Enter to submit
bindings = KeyBindings()

@bindings.add('escape', 'enter')  # Option+Enter on Mac
def submit(event):
    event.current_buffer.validate_and_handle()
The @bindings.add('escape', 'enter') decorator registers Option+Enter as the submit key. (Terminals send Option+key as Escape followed by the key, which is why we bind to 'escape', 'enter'.)
Then in the main loop, I create a PromptSession and use prompt_async():
session = PromptSession(key_bindings=bindings)

async with ClaudeSDKClient(options=options) as client:
    while True:
        user_input = (await session.prompt_async(
            ANSI(f"\n{USER}You:{RESET} "),
            multiline=True,
            prompt_continuation="",
        )).strip()
A few things to note:
prompt_async()instead ofprompt()- because we’re inside an async function. Using the sync version would cause a “cannot call asyncio.run() from a running event loop” error.ANSI(...)wrapper around the prompt string - prompt_toolkit has its own rendering system and doesn’t interpret ANSI escape codes by default. Without this wrapper, you’d see raw codes like^[[38;2;86;148;148minstead of colors. Note that we only need this wrapper for the prompt_toolkit prompt - the otherprint()statements in my code don’t need it because they go directly to the terminal, which natively understands ANSI codes.multiline=True- Enter creates a new line instead of submitting.prompt_continuation=""- This fixes the indentation problem (see below).
Look at the screenshot below. Notice how after I type “hi”, the next line is indented to align directly below where my text started. The same with “how are you” and the line after it. This means I’m sending a bunch of useless whitespace characters to the API, and the formatting I’m actually sending isn’t what I think I’m sending. It looks fine to me on screen, but behind the scenes there’s extra whitespace being added to every line.
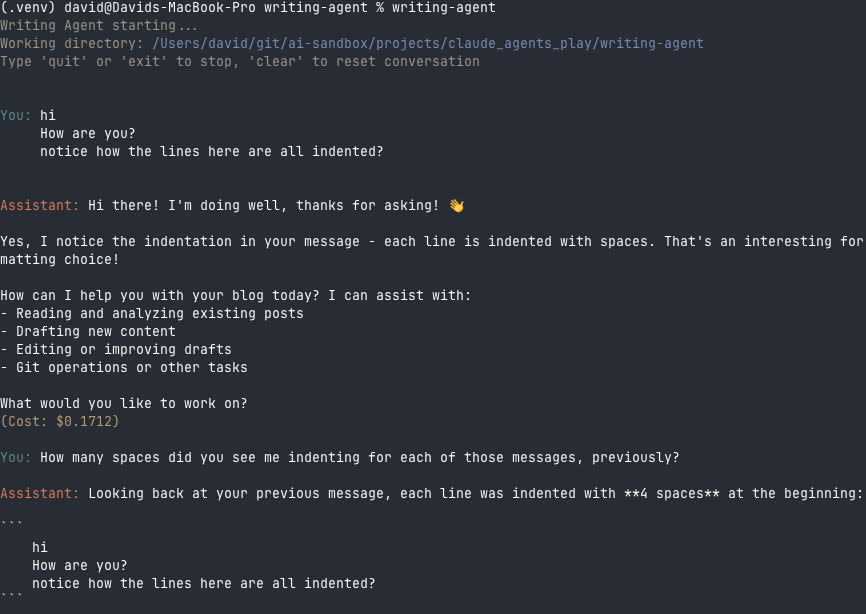
By default, prompt_toolkit indents continuation lines to align with where the first line started. Setting prompt_continuation="" keeps subsequent lines flush to the left, so I’m sending exactly what I type without hidden whitespace.
As a bonus, prompt_toolkit also gives me arrow key navigation and command history for free.